Thank you so much for the good piece of information. https://www.pkisolutions.com/
Creating Highly Available CDP and AIA Locations with Azure, Part 3
Hello everyone, this is the third entry in my “Creating highly available CDP and AIA locations with Azure” series.
Posts in this series:
Deploying Azure Front Door CDN Resource
As we already discussed, Azure Front Door (AFD) is:
A modern cloud Content Delivery Network (CDN) that provides fast, reliable, and secure access between your users and your applications’ static and dynamic web content across the globe
In our scenario, it will act as a HTTP interface for PKI clients who need to fetch CA certificates and CRLs from backing storage accounts. In short, it will look like this:

Deploying Azure Front Door Using Azure Portal
This section provides information how to deploy a storage account using Azure Portal.
- Log on to Azure Portal.
- Expand the left sidebar menu and press + Create a resource blade.
- Type front door in the search box and press Enter.
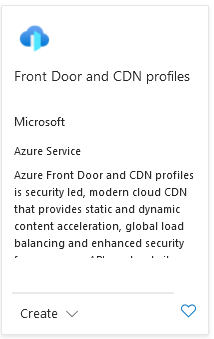
- In the search results page, select Front Door and CDN profiles provided by Microsoft, and press Create.
- On the Compare offerings page, select Azure Front Door and Custom Create options. Press Continue to create a Front Door button:
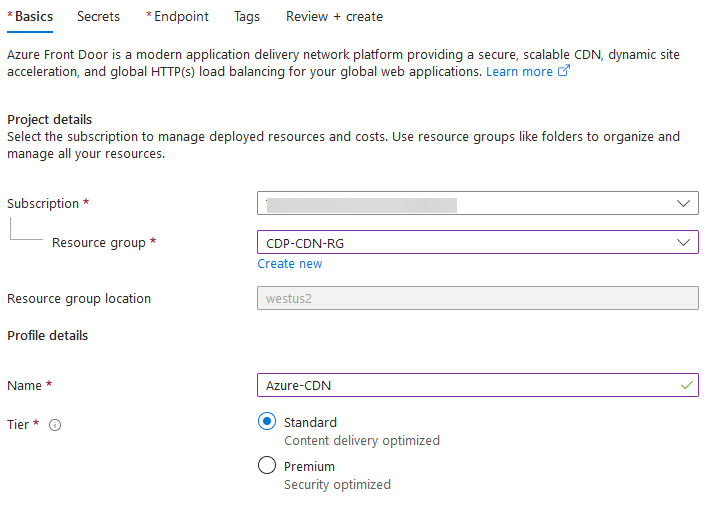
- On the Create a Front Door profile page, select Azure subscription and target resource group where the AFD will be stored. Note that there is no region associated with this resource, because it is a global resource and not bound to any region.
- Specify CDN profile name, for example Azure-CDN.
You may not want to make any references to PKI, because a single AFD instance can be used for multiple workloads. Though, you may reference a PKI relationship in the name if you will use a dedicated AFD instance for PKI purposes only.
- Select the Standard pricing tier.
- Switch to the Endpoint tab and press the Add an endpoint button.
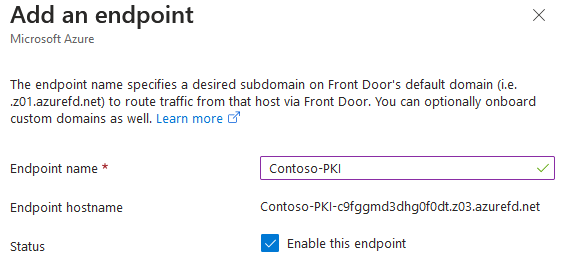
- On Add an endpoint dialog, specify endpoint name. For example,
{mycompany}-PKI, and specify your company name. With recent updates, the user-provided endpoint name doesn’t have to be globally unique, because Azure will append random characters to the provided name in order to guarantee endpoint URL uniqueness. Press Add button.
- After adding an endpoint, you will be presented with a routes table and security policies table. Routes in this context are pointers to origins, since AFD supports a wide range of origins, such as web apps, load balancers, storage accounts and event plain IPs. Here we have to create a new route, configure origin group and origins.
- Press the + Add a route button.
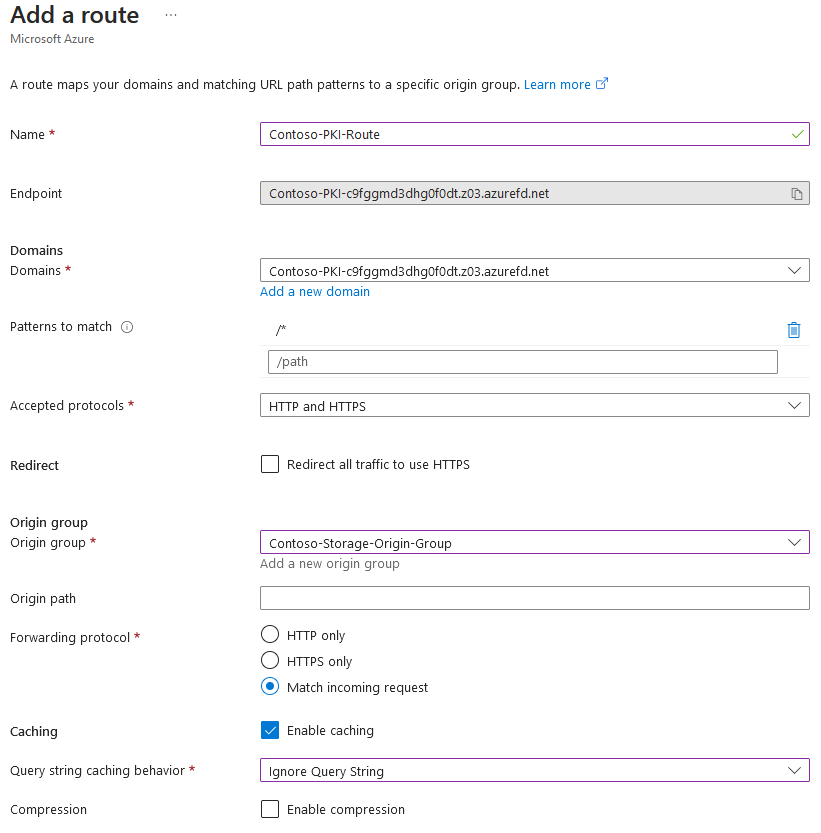
- On the Add a route page, specify route name, for example
{mycompany}-PKI-Route. Use the default selection for domains. We will configure them later. Leave Patterns to match and Accepted protocols with default values. - Uncheck Redirect all traffic to use HTTPS. Again, while HTTPS is a recommended protocol everywhere, this rule doesn’t apply to CDP/AIA URLs, they have to be served over plaintext HTTP.
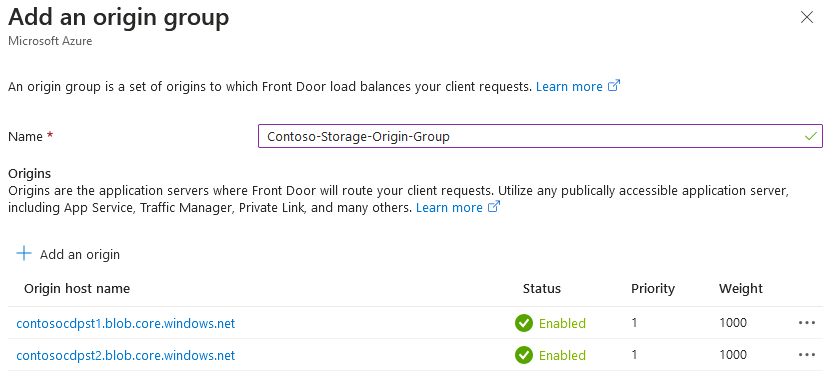
- Press Add a new origin group. Origin group is a group of actual origins that can serve the same content.
- On Add an origin group dialog, specify origin group name. For example,
{mycompany}-Storage-Origin-Group. - Under Origins section, press + Add an origin to add our storage accounts.
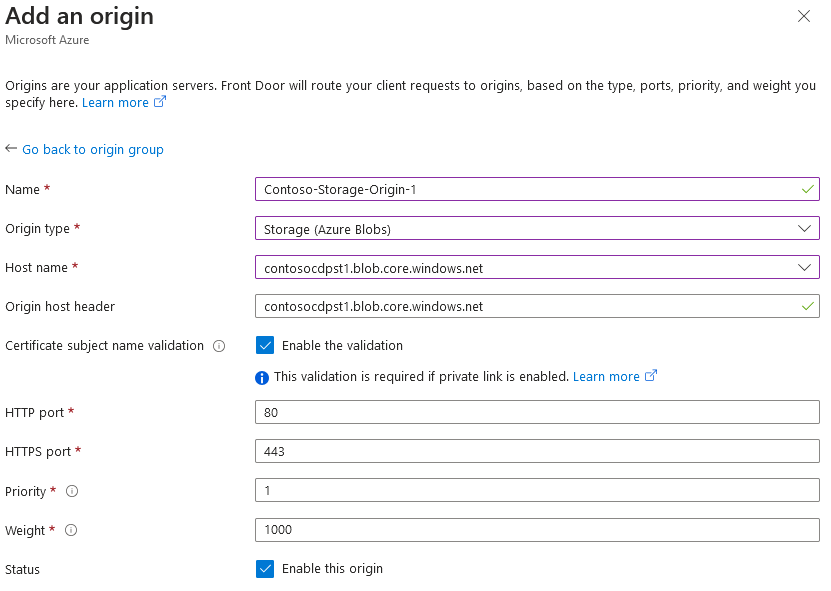
- On the Add an origin dialog, specify origin name, for example,
{mycompany}-Storage-Origin-1. - In the Origin type dropdown control, select Storage (Azure Blobs) option.
- In the Host name dropdown control, select primary storage account.
- Leave the remaining settings with default values and press Add button.
- Repeat steps 17-21 for the secondary storage account and specify the appropriate origin name, for example,
{mycompany}-Storage-Origin-2. - When back to the Add an origin group dialog, ensure that it lists two storage origins and their status is Enabled. Press Add button to add origin group.
- When back to the Add a route page, check Enable caching checkbox.
- In Query string caching behavior dropdown control, select Ignore Query String.
- Press Add button to add a configured route.
- When back to Create a Front Door profile page, press the Next: Tags > button.
- Apply tags as necessary and press the Review + create button.
- Press the Create button to create AFD.
Deploying Azure Front Door Using PowerShell
This section provides information on how to deploy a storage account using PowerShell.
Before you start, ensure that you have installed Az.Cdn PowerShell module. Then you need to authenticate against your Azure tenant using Connect-AzAccount cmdlet (from Az.Accounts PowerShell module).
Review and execute the following PowerShell script to deploy and configure your AFD profile:
# define variables. Set them to match your values
$CompanyName = "Contoso"
$RGName = "CDP-CDN-RG"
$AFDName = "Azure-CDN"
# storage account names in the pool should differ by index only, so it will simplify deployment
$StorageNameTemplate = "contosocdpst{0}"

# autocalculated variables, no need to change
$AFDEndpointName = "$CompanyName-PKI"
$AFDRouteName = "$AFDEndpointName-Route"
$AFDOriginGroupName = "$CompanyName-Storage-Origin-Group"

# Create an Azure Front Door profile
$AFDProfile = New-AzFrontDoorCdnProfile `
    -ResourceGroupName $RGName `
    -Name $AFDName `
    -SkuName Standard_AzureFrontDoor `
    -Location Global

# Create an endpoint and associate with AFD profile
$AFDendpoint = New-AzFrontDoorCdnEndpoint `
    -ResourceGroupName $RGName `
    -Location Global `
    -EndpointName $AFDEndpointName `
    -ProfileName $AFDName

# Create origin group health probe settings
$HealthProbeSetting = New-AzFrontDoorCdnOriginGroupHealthProbeSettingObject `
    -ProbeIntervalInSecond 60 `
    -ProbePath "/" `
    -ProbeRequestType GET `
    -ProbeProtocol Http
# Create origin group load balancing settings
$LoadBalancingSetting = New-AzFrontDoorCdnOriginGroupLoadBalancingSettingObject `
    -AdditionalLatencyInMillisecond 50 `
    -SampleSize 4 `
    -SuccessfulSamplesRequired 3

# Create origin group
$OriginGroup = New-AzFrontDoorCdnOriginGroup `
    -OriginGroupName $AFDOriginGroupName `
    -ProfileName $AFDName `
    -ResourceGroupName $RGName `
    -HealthProbeSetting $HealthProbeSetting `
    -LoadBalancingSetting $LoadBalancingSetting

# Add storage account origins to to origin group
# we will use a 2-iteration loop
1..2 | ForEach-Object {
    # calculate names from dynamic variables
    # '$_' will represent '1' and '2' in each iteration respectively
    $StorageAccountName = $StorageNameTemplate -f $_
    $OriginName = "$CompanyName-Storage-Origin-$_"

    $origin = New-AzFrontDoorCdnOrigin `
    -OriginGroupName $AFDOriginGroupName `
    -OriginName $OriginName `
    -ProfileName $AFDName `
    -ResourceGroupName $RGName `
    -HostName "${StorageAccountName}.blob.core.windows.net" `
    -OriginHostHeader "${StorageAccountName}.blob.core.windows.net" `
    -HttpPort 80 `
    -HttpsPort 443 `
    -Priority 1 `
    -Weight 1000
}

# Add a route to CDN profile
$Route = New-AzFrontDoorCdnRoute `
    -EndpointName $AFDEndpointName `
    -Name $AFDRouteName `
    -ProfileName $AFDName `
    -ResourceGroupName $RGName `
    -ForwardingProtocol MatchRequest `
    -HttpsRedirect Disabled `
    -LinkToDefaultDomain Enabled `
    -OriginGroupId $OriginGroup.Id `
    -SupportedProtocol Http,Https `
    -CacheConfigurationQueryStringCachingBehavior 'IgnoreQueryString' `
    -EnabledState 'Enabled'

Expand Your PKI Visibility
Discover why seeing is securing with revolutionary PKI monitoring and alerting.
Learn More About PKI Spotlight®Configuring AFD Rules
AFD supports conditional rules for inbound requests and/or outbound responses which allow you to modify request pipeline and even overwrite them on a fly. While it is not often needed, I found it reasonable to use AFD rules for CDP/AIA access and here is why:
Unlike most of the web in general and Windows platform in particular, Azure storage is case-sensitive. This means that a blob “rca-rsa.crl” and “rca-RSA.crl” are different blobs. IIS, for example, will make no difference and will return a file “rca-rsa.CRL” to both requests. Both requests will fail in Azure storage account.
The way to make storage accounts and AFD to behave in a way IIS does (case-insensitive), we shall normalize blob casing, by uploading all blobs in lowercase only and then use AFD rules to normalize incoming URLs for a particular route by converting it to lowercase as well. Then it doesn’t matter what casing is used in an incoming URL, after passing the AFD, it will be converted to lowercase when accessing backing storage. This is another reason why you SHOULD NOT use Azure storage to distribute CDP/AIA files without putting AFD (or some kind of URL rewriter) in front. You cannot modify request at storage level. You can at AFD level.
Read more on AFD rules engine on Microsoft website.
Configuring AFD Rules Using Azure Portal
This section provides information how to create the required AFD rules using Azure Portal.
- Log on to Azure Portal.
- Expand left sidebar menu and press Resource groups blade.
- In the resource group list, select the resource group where your storage accounts reside.
- Select AFD resource.
- On left navigation menu, expand the Settings section and select Rule sets blade, and press the Add a rule set button.
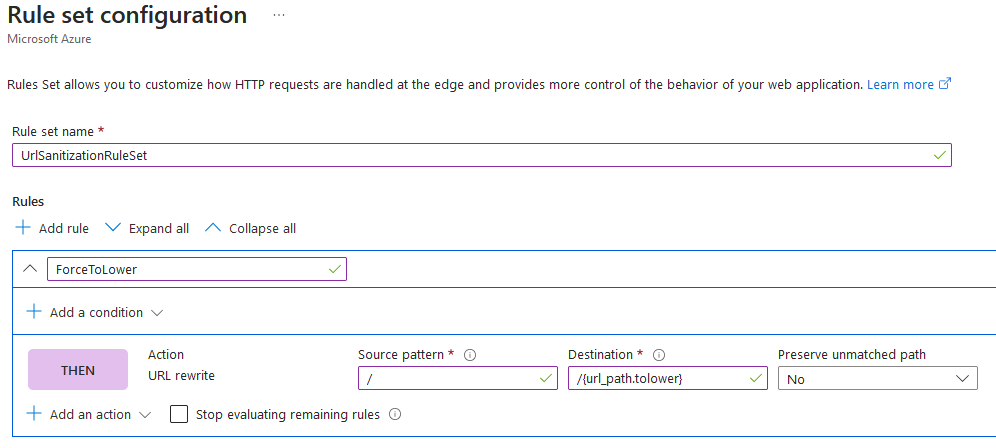
- On the Rule set configuration page, provide rule set name, for example
UrlSanitizationRuleSet. Skip rule conditions, our rule will be unconditional (trigger for all requests). - In the Rule name textbox, provide rule name, for example,
ForceToLower. - Under the Rules section, click on + Add and action and select URL rewrite option.
- In the Source pattern textbox, type forward slash “
/“. - In the Destination textbox, type
/{url_path.tolower}. Content in curly braces is AFD rules engine’s server variables. - In Preserve unmatched path dropdown control, select No.
- Press the Save button to save rule.
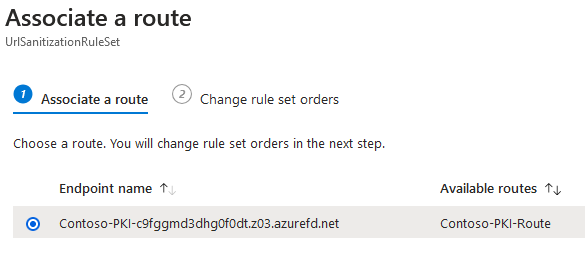
- When back on the Rule sets page, notice that there is a warning triangle in the Endpoints column. We need to associate the rule with endpoint. Press the three-dot context menu on rule entry and select the Associate a route menu item.
- On Associate a route dialog, select the only endpoint and press Next button.
- Press “Associate” button.
Configuring AFD Rules Using PowerShell
This section provides information how to create the required AFD rules using PowerShell.
Review and execute the following PowerShell script:
# define variables
$RuleSetName = "UrlSanitizationRuleSet"
$RuleName = "ForceToLower"

# create blank rule set
$ruleSet = New-AzFrontDoorCdnRuleSet `
    -Name $RuleSetName `
    -ProfileName $AFDName `
    -ResourceGroupName $RGName
# create URL rewrite action to force URL lower case
$action = New-AzFrontDoorCdnRuleUrlRewriteActionObject `
    -Name 'UrlRewrite' `
    -ParameterSourcePattern "/" `
    -ParameterDestination "/{url_path.tolower}" `
    -ParameterPreserveUnmatchedPath $False
# associate action with rule set created above
$rule = New-AzFrontDoorCdnRule `
    -Name $RuleName `
    -SetName "UrlSanitizationRuleSet" `
    -Action $rule `
    -MatchProcessingBehavior 'Stop' `
    -ProfileName $AFDName `
    -ResourceGroupName $RGName
# associate rule set with endpoint route
$Route = Update-AzFrontDoorCdnRoute `
    -Name $AFDRouteName `
    -ProfileName $AFDName `
    -EndpointName $AFDEndpointName `
    -ResourceGroupName $RGName `
    -RuleSet $ruleSet
Configure Custom Domain
When your AFD endpoint is created and configured, it is necessary to configure a custom domain for this AFD endpoint. This process consist of creating and validating and associating the custom domain name within AFD profile. Without proper association, AFD will refuse requests from custom CNAMEs.
Custom domain association in AFD doesn’t require existing CDP/AIA DNS entries. This means that CDP/AIA URLs will continue to point to existing web servers.
- Navigate to AFD Profile.
- Expand Settings section and select Domains blade.
- In top toolbar, press + Add button.
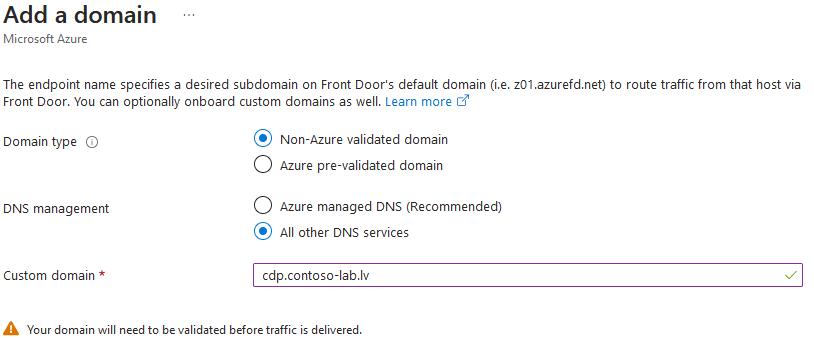
- In Domain type field, select Non-Azure validated domain.
- In DNS management field, select All other DNS services.
Do this even if your DNS is hosted straight in Azure to avoid service disruption. The reason is that if your public DNS zone is hosted by Azure and you select corresponding option, it will force you to select existing DNS record and after adding custom domain, Azure will rewrite DNS entry from existing web servers to all your CDP/AIA URLs will point to incomplete AFD setup.
- In the Custom domain textbox, type existing CDP/AIA URL host name. In my case, it is
cdp.contoso-lab.lv.
- Leave remaining settings with default values and press Add button.
- When back on the Domains page, you will see a new entry with Pending validation status and Unassociated endpoint association.
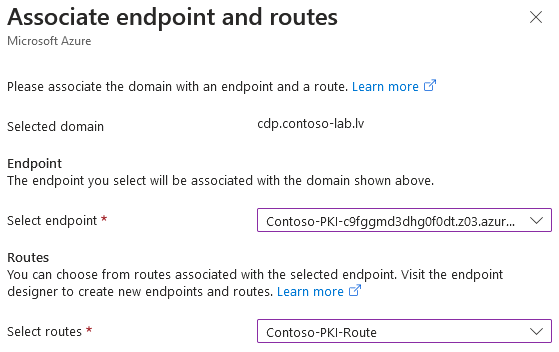
- Press three-dot context menu, and select Associate menu item.
- In Associate endpoint and routes dialog, select endpoint and route created in previous sections:
- Press the Associate button to associate custom domain name.
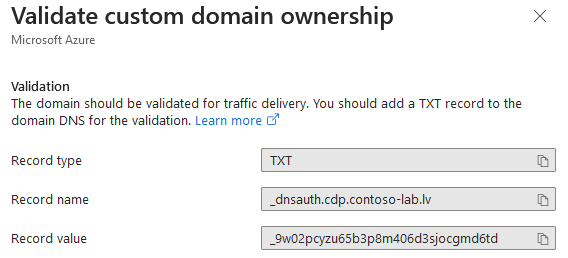
- When back to Domains page, press on Pending link in Validation state column. This will open a dialog with DNS ownership validation instructions. similar to this:
You will have to create a TXT record. It may take up to 1 hour to complete validation after creating TXT record. After domain validation completion, Validation state column will turn to Approved state:
In the DNS state column, you will see a warning icon with “CNAME/alias record is not currently detected” text, which is expected. At this point, we only validated DNS ownership, we did not create/change DNS record yet. It will be the very last step in the entire transition process.
Part 3 Summary
In this part we explored some Azure Front Door deployment considerations and then created and configured AFD to our needs. In my post, I will provide information on how to connect on-premises environment to your storage account and leverage Azure CDN.


 Schedule a Demo


 You will have to create a TXT record. It may take up to 1 hour to complete validation after creating TXT record. After domain validation completion, Validation state column will turn to Approved state: