Creating Highly Available CDP and AIA Locations with Azure, Part 2
Hello everyone, this is the second entry in my “Creating highly available CDP and AIA locations with Azure” series.
Posts in this series:
Start Environment
In my previous post, I provided a setup configuration for us to start from:
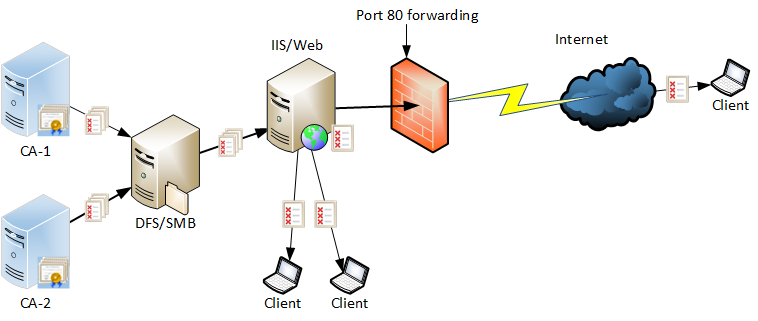
We have three main components:
- CA server (CA1). This is an Enterprise Subordinate CA, which acts as an issuing CA
- DFS server (FS1). This is a file server that hosts the CertData shared folder, where all CAs in our environment will drop their certificates and CRLs.
- IIS server (WEB1). This is a web server that serves CA certificates and CRLs to PKI clients. A dedicated website has an attached virtual directory that points to the CertData shared folder hosted on FS1 file server.
Here is my CAs snapshot from PKI View (pkiview.msc) that shows what CDP/AIA URLs look like:

Here I use the dedicated “cdp” host name, which isn’t used by any other service or application. It doesn’t match any real host name, it is just an alias I chose for CDP/AIA URLs. Next, I use the “CertData” virtual folder just to separate CRT and CRL files from other PKI-related assets I may host on the “CDP” website. This may include a certificate practice statement (CPS) with URL like “http://cdp.contoso-lab.lv/CPS/my-cps.pdf.” So having a virtual directory in URL is optional, but may be handy in some cases. Then, I use the “ica-g1.cr*” file name. This file name stands for “issuing CA, generation 1.” Again, it’s what I chose. In short, the URL consists of virtual aliases in all places: host name, virtual directory name, file name. This approach (use of aliases) helps you in various migration scenarios, so you can switch backing locations without having to change the URL. Once again, CDP/AIA URL planning is a very important part of the overall PKI design process, because these URLs are engraved in issued certificates and if you change your minds, you will have to maintain previous URLs to support already issued certificates until you replace all of them.
Like I mentioned in my previous post, ideally you want to have multiple web servers. If you have external clients, you have to use a host name which resolves to your IIS servers from all internal and external (internet) networks.
I hope our initial environment (starting point) is well-defined to a reasonable extent.
Preparing Your Cloud Infrastructure
This and subsequent sections assume that you already have a valid Azure subscription and permissions to deploy resources and basic Azure Portal navigation skills.
Cloud infrastructure is configured in parallel, so no existing PKI clients are disrupted during the entire migration process.
The first cloud service we need is an Azure Storage account. This storage account will store a copy of the CertData local share and will be used as an origin for Azure Front Door CDN (AFD).
Deploy Azure Storage Account
In this section I will provide the steps to create a storage account. Azure supports various deployment options which provide different levels of flexibility and automation:
- Using Azure Portal web interface. This is the most common option, which allows you to follow a user-friendly wizard interface and help you to understand the options you can configure during deployment. While easy to use, Azure Portal web interface provides little to no automation options.
- Using Azure PowerShell module. Azure provides a number of PowerShell modules that allow you to do almost everything you can do in Azure Portal, but provides a great automation level, so you can do various operations in bulk. The downside of this approach is that you must have a certain level of experience with Azure resources, concepts and PowerShell modules, including command syntax and capabilities. Throughout this series, you will find that PowerShell requires much, much less effort than interacting with Azure Portal.
- Using ARM templates. This is another useful option for resource mass deployment. You can write your own, or adapt an existing resource template to your needs and then use it for bulk deployment from that template. An ARM template is just a JSON file with a deployment configuration. ARM templates support parameters, which you can configure at runtime. For example, the template provides the resource name parameter you specify during deployment. Although, Microsoft is moving ARM templates from JSON to BICEP, main concepts remain the same.
In this blog post, I will provide an Azure Portal guide and a PowerShell equivalent.
Note: Azure Portal isn’t a very static thing. Microsoft tends to change the Azure Portal page layouts and available options quite often. This means that images from Azure Portal may differ from what you see on your screen.
Deploying Primary Azure Storage Account Using Azure Portal
This section provides information on how to create a primary storage account using Azure Portal.
- Log on to Azure Portal.
- Expand left sidebar menu and press the + Create a resource blade. Type “storage account” in search box and press Enter.
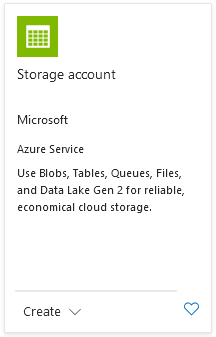
- On the search results page, select Storage Account provided by Microsoft, and press Create.
You will be directed to the Storage Account creation wizard.
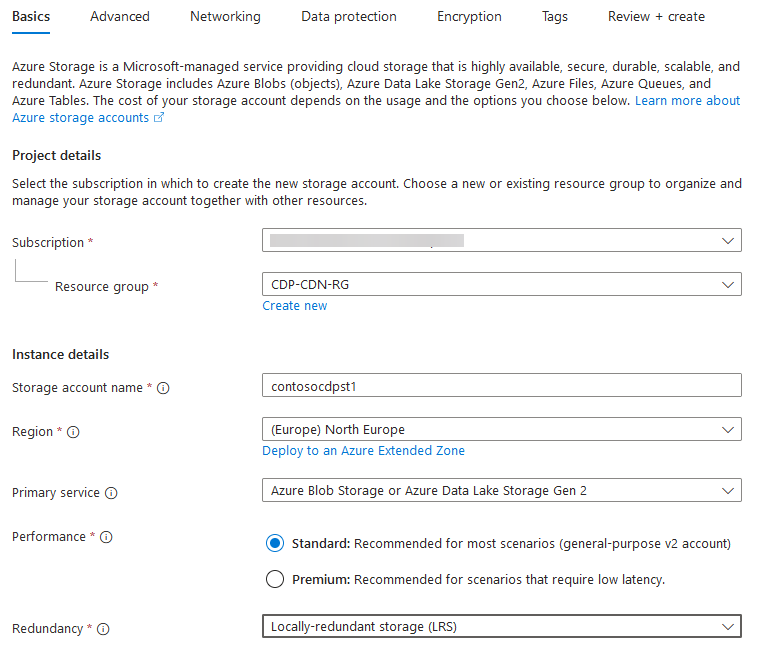
- On the Basics tab, select your subscription and resource group. You can create a new resource group if necessary. Then provide storage account name.
Storage account name must be globally unique (across your entire Azure cloud) and can contain only lower-case letters and digits.
- Select your desired region.
- In the Primary Service dropdown control, select “Azure Blob Storage or Azure Data Lake Storage Gen 2.“
- In the Performance section, select Standard. You can select Premium, however it will increase storage account costs.
You cannot change storage performance tier after your storage account is created.
- In the Redundancy section, select the appropriate redundancy option. The most popular is Geo-Redundant Storage (GRS). Refer to Azure Storage redundancy for more information about each redundancy option. Be aware that the redundancy option will affect storage pricing. LRS is the least redundant and cheapest while RA-GZRS is the most redundant and most expensive. LRS is a sufficient option if you deploy multiple storage accounts and then configure them as a storage pool. If you deploy a single storage account, then GRS, ZRS, or RA-GZRS is recommended.
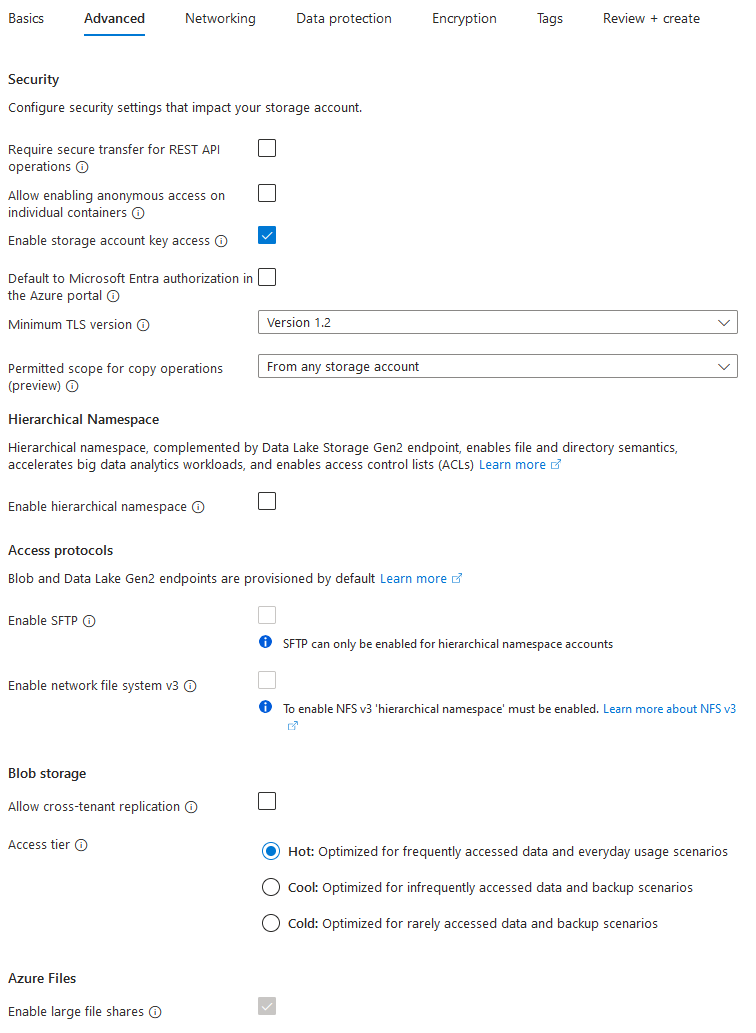
- Switch to the Advanced tab.
- Uncheck Require secure transfer for REST API operations checkbox.
This sounds counterintuitive, but you don’t want to require HTTPS for this storage account. This is due to a nature of CDP/AIA content, which SHALL be served over plain-text HTTP, because content is already signed. Not all PKI clients handle HTTPS links in CDP/AIA extensions and may permanently fail.
Although secure transfer is not required, it is still supported by the storage account. In other words, when the checkbox is checked, then only HTTPS will work. When unchecked, then both, HTTP and HTTPS will work. We will use HTTPS when uploading files from local share to the Azure storage account.
- Uncheck the Allow enabling anonymous access on individual containers checkbox.
- Check the Enable storage account key access checkbox.
- Uncheck the Default to Microsoft Entra authorization in the Azure portal checkbox.
- Select minimum TLS version to Version 1.2.
- Select the appropriate option in Permitted scope for copy operations, or use default. No recommendations here.
- Uncheck the Enable hierarchical namespace checkbox.
- Uncheck everything in Access protocols and Blob Storage.
- Select the Hot access tier under Blob Storage section.
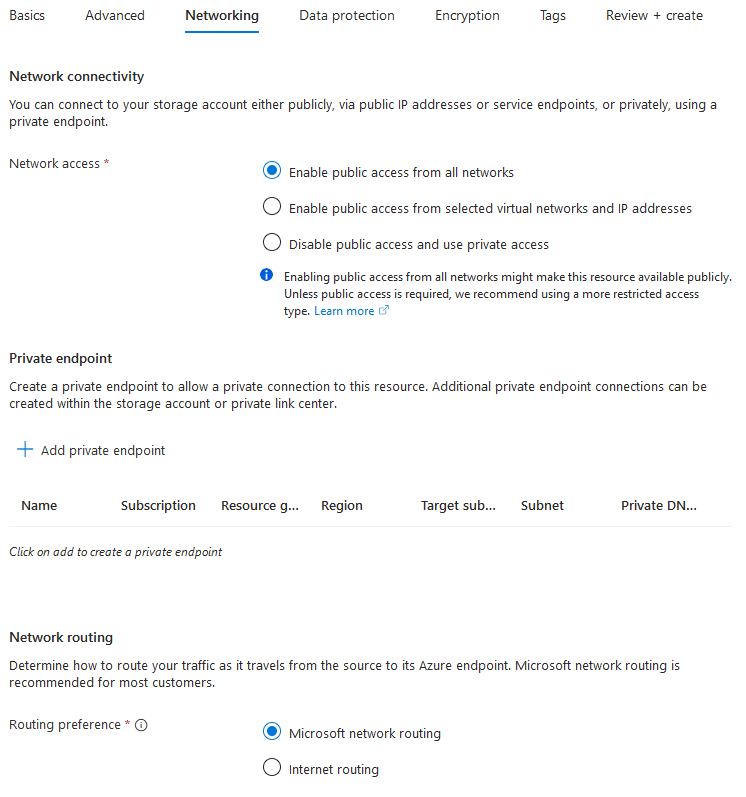
- Switch to Networking tab.
- In the Network access section, select Enable public access from all networks radio button.
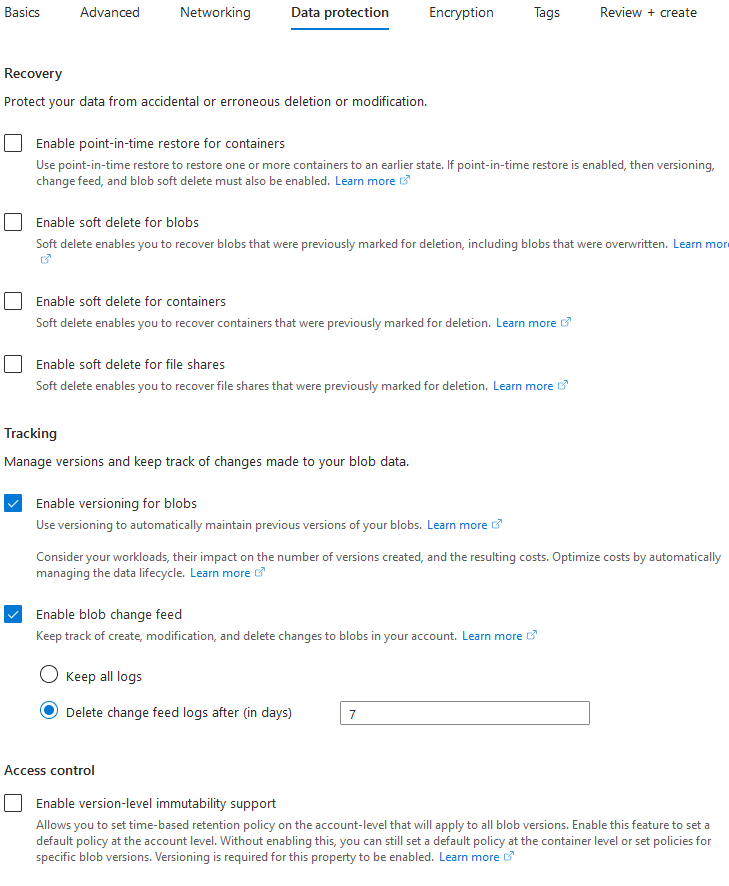
- Switch to the Data protection tab.
- Configure Recovery options as you need. No hard requirements here.
- Check the Enable versioning for blobs checkbox. This setting is required for object replication between storage accounts.
- Check the Enable blob change feed checkbox and specify retention policy. You should specify some fixed retention period to avoid storage cluttering with file versions, which will add to storage costs. 7 days can be a good option.
Switch to the Tags tab and apply tags as necessary. Tags are useful to organize and categorize resources. - Press the Review + create button.
- Double-check selected settings and press the Create button.
- Wait until storage account deployment is finished.
After completing these steps, we will get a storage account with the required settings and enabled for object replication. For redundancy, we will create a secondary storage account in a different region.
Deploying Secondary Azure Storage Account Using Azure Portal
In my case, primary storage is in the North Europe region, secondary will be in Poland Central. To do this, we will repeat steps in previous section with the following changes:
- In step 4, choose a different storage account name. Keep the same resource group.
- In step 5, choose a different region.
- In step 24, uncheck the Enable blob change feed checkbox. Change feed is required only on source (primary) storage account.
All other steps are identical.

Expand Your PKI Visibility
Discover why seeing is securing with revolutionary PKI monitoring and alerting.
Learn More About PKI Spotlight®Deploying primary Storage Account Using PowerShell
This section provides information on how to deploy a storage account using PowerShell.
Before you start, ensure that you have installed Az.Storage PowerShell module. Then you need to authenticate against your Azure tenant using Connect-AzAccount cmdlet (from Az.Accounts PowerShell module).
# Step 1: define configuration variables
# update variables to match your values
$resourceGroupName = "CDP-CDN-RG"
$storageAccountName = "contosocdpst1"
$Region = "NorthEurope"

# Step 2: create storage account
New-AzStorageAccount -ResourceGroupName $resourceGroupName `
    -Name $storageAccountName `
    -SkuName Standard_LRS `
    -Location $Region `
    -AccessTier Hot `
    -AllowBlobPublicAccess $true `
    -AllowSharedKeyAccess $true `
    -AllowedCopyScope AAD `
    -AllowCrossTenantReplication $false `
    -EnableHttpsTrafficOnly $false `
    -Kind StorageV2 `
    -MinimumTlsVersion TLS1_2

# Step 3: enable blob versioning and change feed to support object replication between accounts
Update-AzStorageBlobServiceProperty -ResourceGroupName $resourceGroupName `
    -StorageAccountName $storageAccountName `
    -EnableChangeFeed $true `
    -ChangeFeedRetentionInDays 3 `
    -IsVersioningEnabled $true
This code snippet will create a new storage account and enable it for replication.
Deploying secondary Storage Account Using PowerShell
Secondary storage account creation process is identical to primary with the following differences:
- In Step 1, update configuration variables:
$storageAccountNameand$Region. They must be different than ones used for primary account. - Use updated Step 3 as follows:
# Step 3: enable blob versioning and change feed to support object replication between accounts
Update-AzStorageBlobServiceProperty -ResourceGroupName $resourceGroupName `
    -StorageAccountName $storageAccountName `
    -IsVersioningEnabled $true
As it was mentioned above, only versioning is required on target storage account to enable replication.
Configure Azure Storage Accounts
This section contains steps to configure storage accounts, which includes:
- Create blob containers on both accounts. A scheduled task in on-premises server will upload CA files to this blob container.
- Configure Access Policy on primary storage account. A scheduled task in on-premises server will use policy-based Shared Access Signature (hereinafter Stored Access) to access primary storage account.
- Configure object replication between storage accounts. Once file is uploaded to primary storage account, Azure will automatically replicate it to secondary storage account.
Create Blob Containers Using Azure Portal
In this section, we will create a blob container on both storage accounts using Azure Portal.
- Log on to Azure Portal.
- Expand left sidebar menu, and press the Resource groups blade.
- In the resource group list, select resource group where storage accounts reside.
- Select primary storage account.
- On the left navigation menu, expand the Data Storage section and click on Containers blade.
- On Containers blade’s toolbar menu, select + Container to create a new blob container.
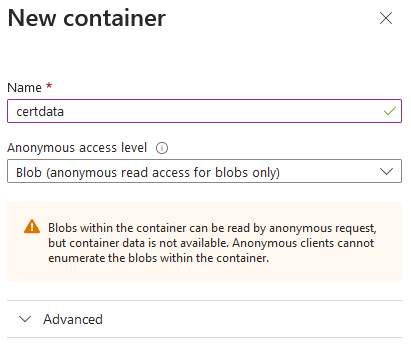
- In New container dialog, specify container name
certdata. Container name must be provided in lowercase. - Change Anonymous access level to Blob.
Press the Create button to create blob container. - Repeat steps 1-9 for the secondary storage account (in step 4, select secondary storage account).
Create Blob Containers Using PowerShell
In this section, we will create a blob container on both storage accounts using PowerShell.
Ensure that your PowerShell session is authenticated in Azure. Run Connect-AzAccount cmdlet if necessary. Then use the following snippet:
# specify storage account names and separate with a comma and pass to pipeline
"contosocdpst1", "contosocdpst2" | ForEach-Object {
    # create storage account connection context
    $ctx = New-AzStorageContext -StorageAccountName $_
    # create blob container and configure anonymous access policy
    New-AzStorageContainer -Context $ctx -Container "certdata" -Permission Blob
}
Configure Stored Access Policy Using Azure Portal
In this section, we will configure Stored Access Policy on the primary storage account using Azure Portal.
- Navigate to the container list on the primary storage account.
- Press three-dot context menu on certdata container and select Access policy menu item.
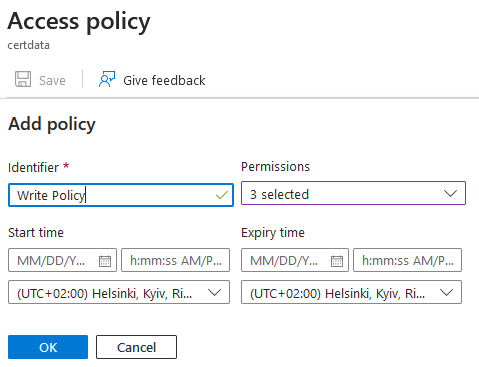
- In Access policy dialog, under Stored access policies, press on + Add policy.
- Provide policy identifier, for example Write Policy.
- In Permissions dropdown list check Read, Create and Write.
- Press OK to create policy.
Configure Stored Access Policy Using PowerShell
In this section, we will configure Stored Access Policy on the primary storage account using PowerShell.
Ensure that your PowerShell session is authenticated in Azure. Run Connect-AzAccount cmdlet if necessary. Then use the following snippet:
$ctx = New-AzStorageContext -StorageAccountName "contosocdpst1"
New-AzStorageContainerStoredAccessPolicy -Context $ctx -Container "certdata" -Policy "Write Policy" -Permission "rcw"
Configure Object Replication Using Azure Portal
In this section, we will configure object replication between storage accounts using Azure Portal.
- Log on to Azure Portal.
- Expand left sidebar menu and press Resource groups blade.
- In the resource group list, select resource group where storage accounts reside.
- Select primary storage account.
- On left navigation menu, expand Data management section and click on Object replication blade.
- On Object replication page, press + Create replication rules
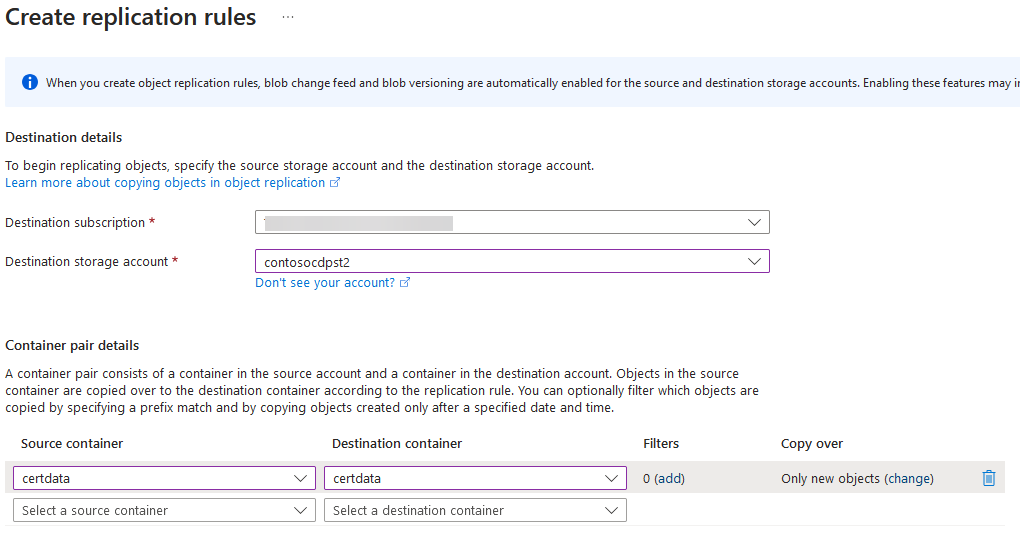
- On Create replication rules page, select destination subscription and destination storage account (secondary storage account)
- In Container pair details section, select certdata container for both, source and destination container.
- Press Create button to create replication policy.
Configure Object Replication Using PowerShell
In this section, we will configure object replication between storage accounts using Azure Portal.
Ensure that your PowerShell session is authenticated in Azure. Run Connect-AzAccount cmdlet if necessary. Then use the following snippet:
# set variables
$ContainerName = "certdata"
# here we get storage account object, not simple name
$SourceStorageAccount = Get-AzStorageAccount -ResourceGroupName $resourceGroupName -Name "contosocdpst1"
$DestinationStorageAccount = "contosocdpst2"

# create detached replication rule by specifying replicated container name
# which is identical on both replication ends
$rule = New-AzStorageObjectReplicationPolicyRule `
    -SourceContainer $ContainerName `
    -DestinationContainer $ContainerName
# create replication policy from created rule on destination account
# and store policy in variable.
# this will create inbound replication policy
$policy = Set-AzStorageObjectReplicationPolicy -ResourceGroupName $resourceGroupName `
    -StorageAccountName $DestinationStorageAccount `
    -PolicyId default `
    -SourceAccount $SourceStorageAccount.Id `
    -Rule $rule
# apply created policy to source storage account.
# this will create outbound replication policy
Set-AzStorageObjectReplicationPolicy -ResourceGroupName $resourceGroupName `
    -StorageAccountName $SourceStorageAccount.StorageAccountName `
    -InputObject $policy
Part 2 Summary
In the second entry in this series, we created two storage accounts in two different regions, configured containers, access policy and object replication between both storage accounts using both, Azure Portal and PowerShell. As you may see, PowerShell approach is much shorter and easier than Azure Portal GUI.
In next blog, I will provide information on how to create and configure Azure Front Door to provide a scalable HTTP interface for PKI clients.


 Schedule a Demo
 You will be directed to the Storage Account creation wizard.